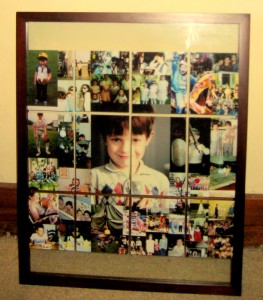
 This tutorial explains how to assemble a 15.5 by 15.5 photo collage, in a 16 by 24 inch wooden frame. Expect to spend around 20 dollars (depending on sales and coupons) and a few hours, but it’s remarkably simple for a very sophisticated result.
There are 3 sections: 1.) Create the Collage; 2.) Print it; and 3.) Frame it.
Materials:
16 by 24 inch clear glass and wood frame
Ruler
Chalk
Scotch tape
Paper Cutter/Scissors
Picasa Software (download Here)
Gimp Software (download Here)
1. Collect approximately 25-40 photographs. If not digital, scan them into your computer. While scanning, set the resolution to be 300 or 400 dpi. Save the photographs as .jpg files.
2. Import the selected photographs into Picasa.
3. In Picasa, select all the desired photographs, make sure each is highlighted in blue. To transform them into a collage, either click the orange and blue “Collage” icon in the bottom toolbar, or go to Create… Photo Collage.
4. The “Collage” mode will appear. Click into the “Settings” dialog box on the left side. Select “Frame Mosaic” from the drop down menu. Set the Grid Spacing to “None”. For Page Format, choose “Square: CD Cover”.
5. Choose which photograph you want to be the center of the collage. In the draft collage, click on the desired photograph. Then click “Set as Frame Center” on the left hand dialog box.
6. If you don’t like Picasa’s suggested layout of the photos surrounding the center, hit the “Shuffle Pictures” button, beneath the draft collage. Continue until you’re happy with the collage.
7. Save the collage by clicking “Create Collage” in the left hand dialog box. It should take a minute or so to save the file.
1. Open the collage in Gimp.
2. Resize the image and improve its resolution, by going to “Image”: “Scale Image”. Make sure that the X Resolution/Y Resolution are linked together — that the chain icon is connected (if it is disconnected, click the icon to connect them). Change “Image Size” measurement from “pixels” to “inches”. Now, steadily increase the X Resolution. The Width and Height should decrease as you increase the resolution. Continue to increase the Resolution until the Width and Height reach 15 inches each. It should be about 300 pixels/in.
3. Copy the entire image to the clipboard: go to “Select”: “Select All”, and then to “Edit”: “Copy”.
4. Create a new image. Go to “File”: “New”. The dialog box “Create a New Image” will pop up. Change the measurement from pixels to inches. Set the width to 16 inches and the height to 18 inches. Click OK. A new image will pop up.
5. Paste the image to the new file. Go to “Edit”: “Paste”. The collage image will be automatically placed in the center of the white background. Anchor the image, go to “Layer”: “Anchor Layer”.
6. Now divide the 16 by 18 image into a series of twelve 4 by 6 rectangles. To do this, use the “Rectangle Select” tool, the first icon in your Toolbox dialog. Click on the icon, and then at the bottom half of the dialog box, switch the measurements from pixels to inches for both ‘Position’ and ‘Size’.
Set the ‘Position’ coordinates to 0 and 0, and the ‘Size’ to 4 and 6. There should now be a dotted 4×6 box around the top left corner of the image.
Go to “Image”: “Crop to Selection”. The image should shrink to the 4×6 box.
Save the 4×6 image to a new file — go to “File”: “Save As”. Save the file as “Collage 01.jpg”.
7. Now, repeat the last step for the next eleven 4×6 images. Always keep the ‘Size’ to 4×6, it’s just a matter of changing the ‘Position’ coordinates. Follow the list below:
1: 0, 0
2: 0,4
3: 0, 8
4: 0, 12
5: 6, 0
6: 6, 4
7: 6, 8
8: 6, 12
9: 12, 0
10: 12, 4
11: 12, 8
12: 12, 12
Save each file under a different name: that is “collage 01.jpg”, “collage 02.jpg” and on to “Collage 12.jpg”
8. Now, send the pictures away! Have them printed out wherever you like.
1. Once you’ve got the printed photographs, now crop off all the white from them. Use scissors, or even better a paper cutter. Crop the photos carefully, removing all the white from their edges.
2. Disassemble your glass frame.
3. On the center of one sheet of the glass, measure out a 15.5 by 15.5 inch square. Mark it on the glass with chalk. That means, on each vertical border there will be .25 inches from each glass edge to the chalk. On the horizontal border, there will be 4.25 inches from each glass edge to the chalk.
4. Once you’ve drawn the 15.5 by 15.5 inch square, now position the photographs within it. Use the scotch tape to affix them to the glass. Leave a small gap between the photographs, approximately .16 inch along their vertical edges, and .25 inches along their horizontal edges.
Or you can eyeball it — just make sure that the photographs are strictly parallel and perpendicular to each other.
5. Wipe off the chalk markings with a cloth, and if necessary use some Windex too.
6. Reassemble the frame — sandwiching the photographs between the two glass sheets very carefully.
And there it is! You’re done, congratulations, collage!
